Feature: Display the message sent from IG app in live chat
when the business is replying from the Instagram business inbox it will now sync messages inside the live chat inbox by displaying the message and a Meta icon
Feature: Added new Partner Custom menu location “AI Hub” under Flows with iframe support
with this new location partners can create custom menus inside the AI hub which makes it easier for clients to access certain third party AI settings either by going to the direct page in a new tab or by iframing it inside the hub itself if it is supportedcustom menu AI Hub location
Feature: Users can now click quoted messages in live chat to jump to the original message
sometimes it is hard to find specific messages in a long chat history. with this update when pressing a quoted message from earlier you are able to go directly towards that section in the conversation to get more context when and if needed
User access is now separated from each different domain
Previously users who created an account on UChat could also use that same account on any partner domain. We have now separated this access to improve security for our partners
add Footer text under input bot for webchat widget
There is a new section added which is called the footer textwebchat widget footer textthis allows you to add a footer just above the UChat branding which enables you to link to any webpage you'd like. use case could be:
Facebook Utility Messages — Re-engage Users Beyond the 24-Hour Window
With the deprecation of Messenger Tags, businesses could no longer follow up with Facebook Messenger users outside the standard 24-hour messaging window. Utility Messages solve this — allowing compliant, template-based follow-ups even after the window has closed.
What's New
📩 Utility Message Templates — a new template type available under Chatbot → Contents → Utility Message Templates
🔁 Send messages outside the 24-hour window — reach users for transactional/utility purposes (order updates, appointment reminders, support follow-ups) after the standard window expires
User StatusAllowed MessagesWithin 24 hours of last interaction | Standard messages + Utility Templates Outside 24-hour window | Utility Templates only
Key Rules & Constraints
RuleDetailTemplate Approval | Mandatory before use Variables | Must include sample values when creating template Buttons | Maximum 3 per template Permission | "Manage and Access Page Utility Messaging" required Purpose | Utility/transactional only — NOT for marketing
⚠️ Important: Utility Messages must NOT be used for marketing purposes. Misuse risks permanent ban from Meta.
A new Partner API endpoint allows partners to programmatically retrieve their current credit balance — useful for automated billing monitoring, low-credit alerts, and partner dashboard integrations.
New Endpoint
MethodEndpointDescriptionGET | /partner/credit-balance | Get the partner's current credit balance
Feature: add new API - Agent Group - list, view, create, update, delete
New API — Agent Group Management (Full CRUD)
Six new Agent Group API endpoints allow you to programmatically manage agent groups in your workspace — list all groups, view a specific group, create, update, delete, and update group members.
New Endpoints
MethodEndpointDescriptionGET | /team/agent-groups | List all agent groups in the workspace GET | /team/agent-group/{id} | View a specific agent group by ID POST | /team/create-agent-group | Create a new agent group PUT | /team/update-agent-group/{id} | Update an existing agent group DELETE | /team/delete-agent-group/{id} | Delete an agent group by ID POST | /team/update-agent-group-users/{id} | Update the members (agents) in a group
📋 List all agent groups — retrieve all configured groups with a single GET call
🔍 View a specific group — fetch full details of one group by its ID
➕ Create agent groups — programmatically provision new groups for new workspaces or departments
✏️ Update agent groups — rename or reconfigure groups without touching the UI
🗑️ Delete agent groups — remove groups via API for cleanup or workspace teardown
👥 Update group members — add or remove agents from a group programmatically
Use Cases
Partner workspace provisioning — automatically create standard agent groups (e.g., Sales, Support, Billing) when setting up new client workspaces via API
CRM/HR integrations — sync team structure changes from external systems into UChat agent groups automatically
Automation workflows — dynamically reassign agent groups based on business rules using n8n, Zapier, or custom integrations
Pairs with the existing POST /subscriber/assign-agent-group endpoint to create a group and immediately assign users to it in a single workflow
Why It Matters
Completes the agent management API surface alongside existing agent assignment, listing, and conversation endpoints
Enables fully automated workspace setup and team management without manual UI intervention
Particularly valuable for partners managing multiple client workspaces at scale
Feature: add new API - Broadcast whatsapp template by tags and Broadcast whatsapp template by user ids
New API — Broadcast WhatsApp Template by Tags & by User IDs
Two new Sending API endpoints allow you to programmatically broadcast WhatsApp message templates to specific groups of subscribers — either by targeting a list of user IDs directly or by targeting subscribers with specific tags.
New Endpoints
MethodEndpointDescriptionPOST | /subscriber/broadcast-whatsapp-template-by-user-id | Broadcast a WhatsApp template to a specific list of user IDs POST | /subscriber/broadcast-whatsapp-template-by-tag | Broadcast a WhatsApp template to all subscribers with matching tags
ParameterDescriptionuser_id_list | Comma-separated list of subscriber user IDs (by-user-id endpoint) tags / exclude_tags | Array of tag IDs to include/exclude (by-tag endpoint) wa_template.namespace / name / lang | Template identifiers — find these via /api/whatsapp-template/list use_default_values | Set to "yes" to use template defaults, or provide custom params scheduled_time | Unix timestamp for scheduled delivery (optional) max_per_minute | Rate limit for sending (default: 60/min)
Scope Required
Manage Flow
Why It Matters
Enables fully programmatic WhatsApp template campaigns from external systems (CRMs, e-commerce platforms, n8n automations)
Tag-based targeting allows dynamic audience selection without hardcoding user IDs
exclude_tags support prevents duplicate sends to users who should be excluded
Scheduled delivery and rate limiting make it safe for large-scale broadcast operations
👉 Located at: API Docs → Sending → broadcast-whatsapp-template-by-user-id / broadcast-whatsapp-template-by-tag Published: March 24, 2026 at 6:28 am
Feature: add new type Long JSON for custom user fields, allow to add up to 10 Long JSON user fields, also migrated AI Agent Messages to Long JSON type
New Custom User Field Type: Long JSON
A new custom user field type — Long JSON — is now available, designed to store large structured data objects per user. Up to 10 Long JSON fields can be created per workspace. Existing AI Agent Messages fields have also been migrated to the Long JSON type automatically.
What's New
🗂 New field type: Long JSON — stores large JSON objects as a custom user field value, beyond the size limits of the standard JSON field type
🔢 Up to 10 Long JSON fields per workspace — a dedicated allocation separate from other field type limits
🤖 AI Agent Messages migrated to Long JSON — the system field used to store AI Agent conversation history has been automatically migrated from the standard JSON type to Long JSON, enabling longer conversation histories to be stored reliably
📄 Accessible and editable via the standard User Fields interface alongside all other custom field types
How to Use
Go to Settings → User Fields (or any interface where custom fields are managed)
Click + Add Field
Select Long JSON as the field type
Name the field and save
You can create up to 10 Long JSON fields per workspace
Standard JSONLong JSONUse case | Small structured data | Large structured data, conversation histories Storage limit | Standard field size | Extended size for large payloads Max fields | Shared field limit | Up to 10 dedicated fields AI Agent Messages | Previous type | ✅ Migrated here
Why It Matters
AI Agent Messages can now store much longer conversation histories per user without hitting JSON field size limits
Partners and power users who store complex nested data (product configurations, form responses, CRM sync payloads) have a dedicated, larger field type to use
The automatic migration of AI Agent Messages means no action is required — existing conversation histories are preserved and now more scalable
👉 Located at: Settings → User Fields → + Add Field → Long JSON Documentation: User Fields — Long JSON Published: March 24, 2026 at 6:24 am
Feature: add User Ended Web Chat trigger for webchat widget
User Ended Web Chat — New Automation Trigger
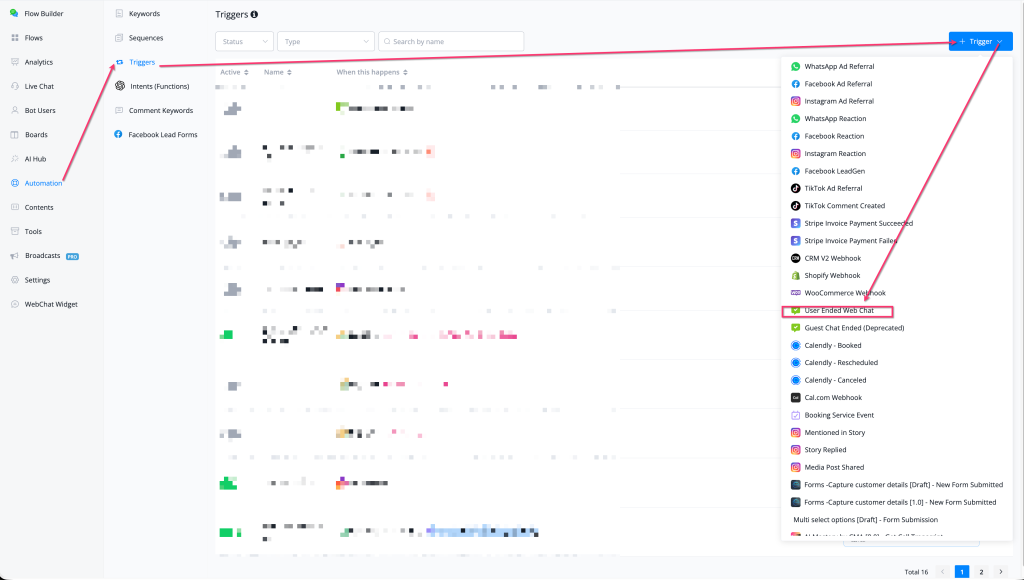
A new trigger — User Ended Web Chat — is now available in Automation → Triggers, allowing you to fire a flow automatically when a user closes or ends a web chat session on your webchat widget.
What's New
🌐 New trigger: User Ended Web Chat — fires when a visitor ends a web chat session via the webchat widget
🔄 Replaces the now-deprecated Guest Chat Ended trigger (still available but marked as deprecated)
⚡ Available in Automation → Triggers → + Trigger → select "User Ended Web Chat"
🔗 Works with all webchat widget types (Chat Button, Embedded Chat, etc.)
How to Use
Go to Automation → Triggers
Click + Trigger (top-right)
Scroll to the web chat section and select User Ended Web Chat
Connect it to a flow — this flow will run automatically when a user ends a web chat session
Use Cases
Send a follow-up message or survey after a web chat session ends
Update a custom user field (e.g., last_chat_ended_at) when the session closes
Trigger a re-engagement flow if the user didn't complete a key action during the chat
Notify an agent or CRM when a visitor exits without converting
Why It Matters
Enables post-chat automation — a common requirement for lead capture, CSAT surveys, and re-engagement sequences
Supersedes the deprecated Guest Chat Ended trigger with a more accurate, user-scoped event
Closes the web chat automation loop: trigger on open → interact → trigger on close
👉 Located at: Automation → Triggers → + Trigger → User Ended Web Chat Note: Guest Chat Ended is now deprecated — migrate existing triggers to User Ended Web Chat Published: March 13, 2026
Feature: add Default AI Provider in AI Hub Settings, used by AI Intent Recognition and AI Task
Default AI Provider Setting in AI Hub
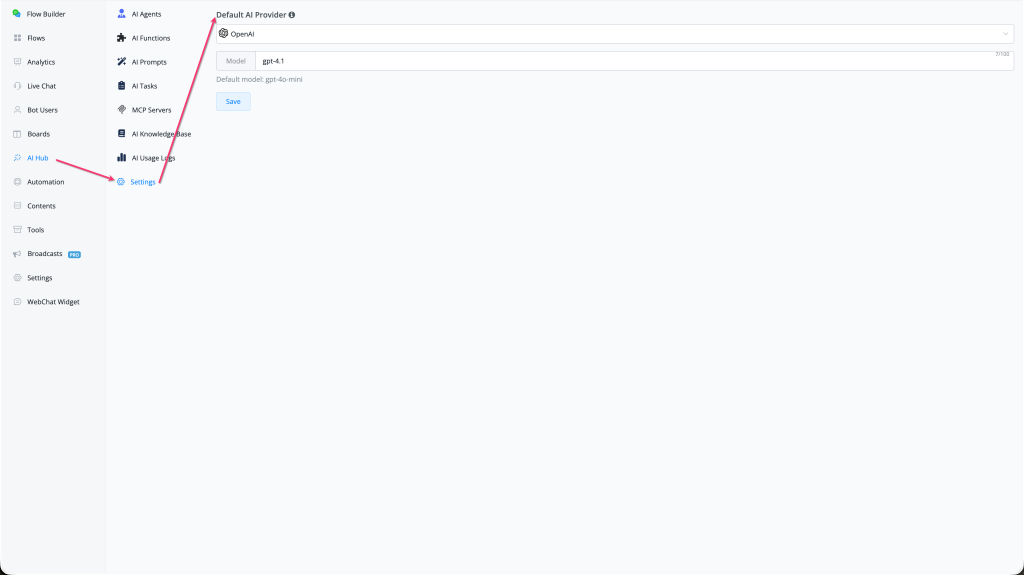
A new Default AI Provider setting is now available in AI Hub → Settings — allowing you to configure the global default AI provider and model used by AI Intent Recognition and AI Tasks across all flows in the workspace.
What's New
🤖 New setting: Default AI Provider — found at AI Hub → Settings (gear icon in the AI Hub submenu)
🔌 Select from any supported AI provider: OpenAI, Anthropic (Claude), xAI (Grok), Groq, and more
🧩 Set a specific Model within the chosen provider (e.g., gpt-4.1 for OpenAI)
📋 A Default model hint is shown below the model field (e.g., "Default model: gpt-4o-mini") to indicate the fallback when no model is specified
💾 Click Save to apply — takes effect immediately across all AI features that use the default provider
How to Use
Go to AI Hub in the left sidebar
Click Settings (gear icon, bottom of the AI Hub submenu)
Under Default AI Provider, select your preferred provider from the dropdown (e.g., OpenAI)
Enter a specific Model name if desired (e.g., gpt-4.1) — leave blank to use the provider default
Feature: add Partner Groq in Partner settings, allow to use partner groq api key for clients
Partner Setting — Use Partner Groq API Key as Default for Clients
Partners can now configure their own Groq API key in Whitelabel Settings and set it as the default Groq key used across all client workspaces — completing the full AI provider key management trio alongside OpenAI and xAI.
What's New
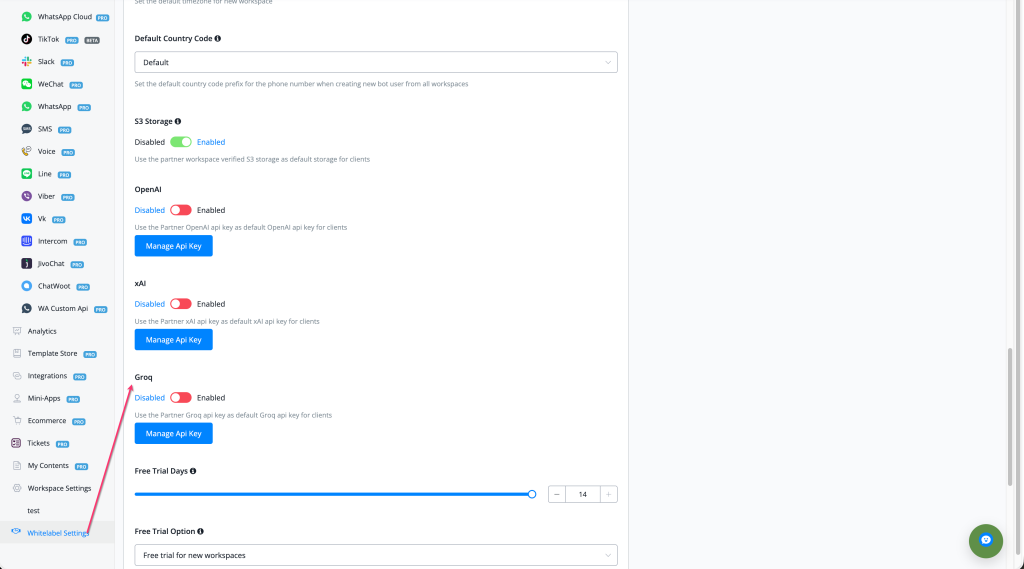
🔑 New Partner Setting: Groq — found under Whitelabel Settings below the OpenAI and xAI partner key sections
🔄 Toggle Enabled/Disabled to activate the partner Groq key as the default for all client workspaces
🛠 Manage API Key button — add, update, or rotate the Partner Groq API key at any time
🤖 When enabled, all client workspaces use the partner's Groq key by default — no per-client Groq key setup required
⚡ Powers Groq-based features across client workspaces including AI Agents, AI Tasks, and the new Groq whisper-large-v3-turbo audio transcription
How to Use
Go to Whitelabel Settings in the left sidebar
Scroll to the Groq section (below OpenAI and xAI)
Toggle the switch to Enabled
Click Manage API Key to enter your Groq API key
All client workspaces will now use your partner Groq key as their default — no per-client configuration required
ProviderSettingDescriptionOpenAI | Partner OpenAI | Use partner OpenAI key as default for all clients xAI | Partner xAI | Use partner xAI key as default for all clients Groq | Partner Groq (new) | Use partner Groq key as default for all clients


 Powered by FeedBear