Feature: add new option Groq whisper-large-v3-turbo for Audio transcription in live chat settings
Groq whisper-large-v3-turbo Added for Audio Transcription in Live Chat
A new audio transcription provider option — Groq whisper-large-v3-turbo — is now available in Live Chat Settings, giving agents ultra-fast, cost-efficient voice-to-text transcription for incoming audio messages.
What's New
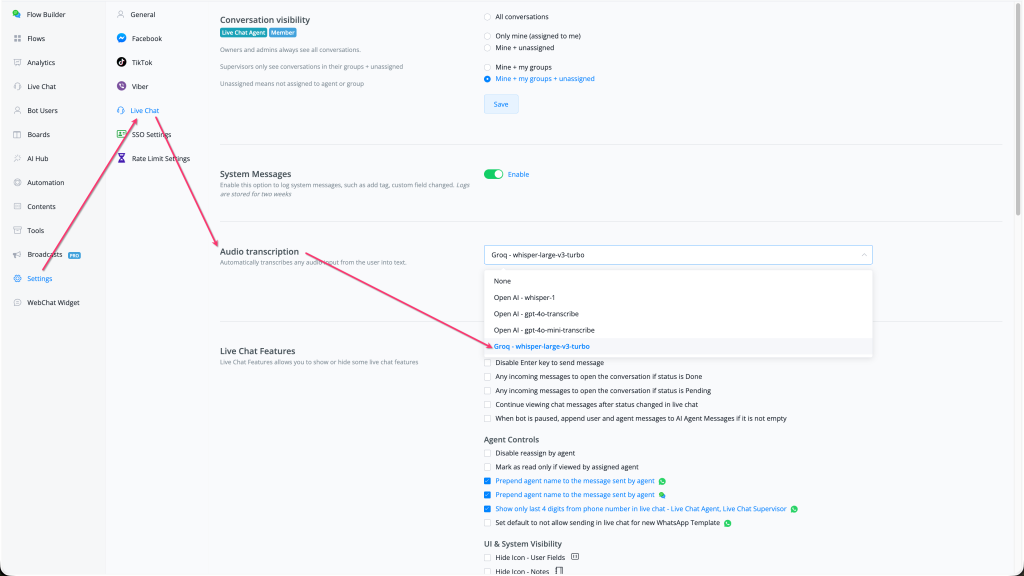
🎙️ New transcription option: Groq - whisper-large-v3-turbo — added to the Audio Transcription dropdown in Live Chat Settings
⚡ Groq's hardware-accelerated inference delivers the fastest Whisper transcription available — typically under 1 second for short audio clips
💰 More cost-efficient than OpenAI Whisper for high-volume transcription workloads
🔄 Highlighted as the new default in the dropdown (selected option shown in blue)
Full Audio Transcription Options
OptionProviderNotesNone | — | Transcription disabled Open AI - whisper-1 | OpenAI | Standard Whisper model Open AI - gpt-4o-transcribe | OpenAI | GPT-4o based transcription Open AI - gpt-4o-mini-transcribe | OpenAI | Lightweight GPT-4o transcription Groq - whisper-large-v3-turbo | Groq | ⚡ New — fastest option
How to Use
Go to Settings → Live Chat
Scroll to the Audio transcription section
Select Groq - whisper-large-v3-turbo from the dropdown
Save — all incoming audio messages in Live Chat will now be automatically transcribed to text using Groq's Whisper engine
Why It Matters
Groq's LPU (Language Processing Unit) hardware runs Whisper at significantly higher speeds than CPU/GPU-based OpenAI Whisper — reducing transcription latency for agents in real-time support conversations
Pairs naturally with the Partner Groq API Key setting (released same day) — partners can use their own Groq key to power transcription across all client workspaces
Enables a fully Groq-powered AI stack within UChat (AI Agents + AI Tasks + Audio Transcription)
👉 Located at: Settings → Live Chat → Audio transcription → Groq - whisper-large-v3-turbo Published: March 10, 2026
Feature: allow agent to select and send up to 5 images or files in live chat
Multi-File Upload in Live Chat — Send Up to 5 Images or Files at Once
Agents can now select and send up to 5 images or files simultaneously in the Live Chat media picker — eliminating the need to send attachments one at a time.
What's New
📎 Batch file selection — select up to 5 images or files in a single send action from the media picker
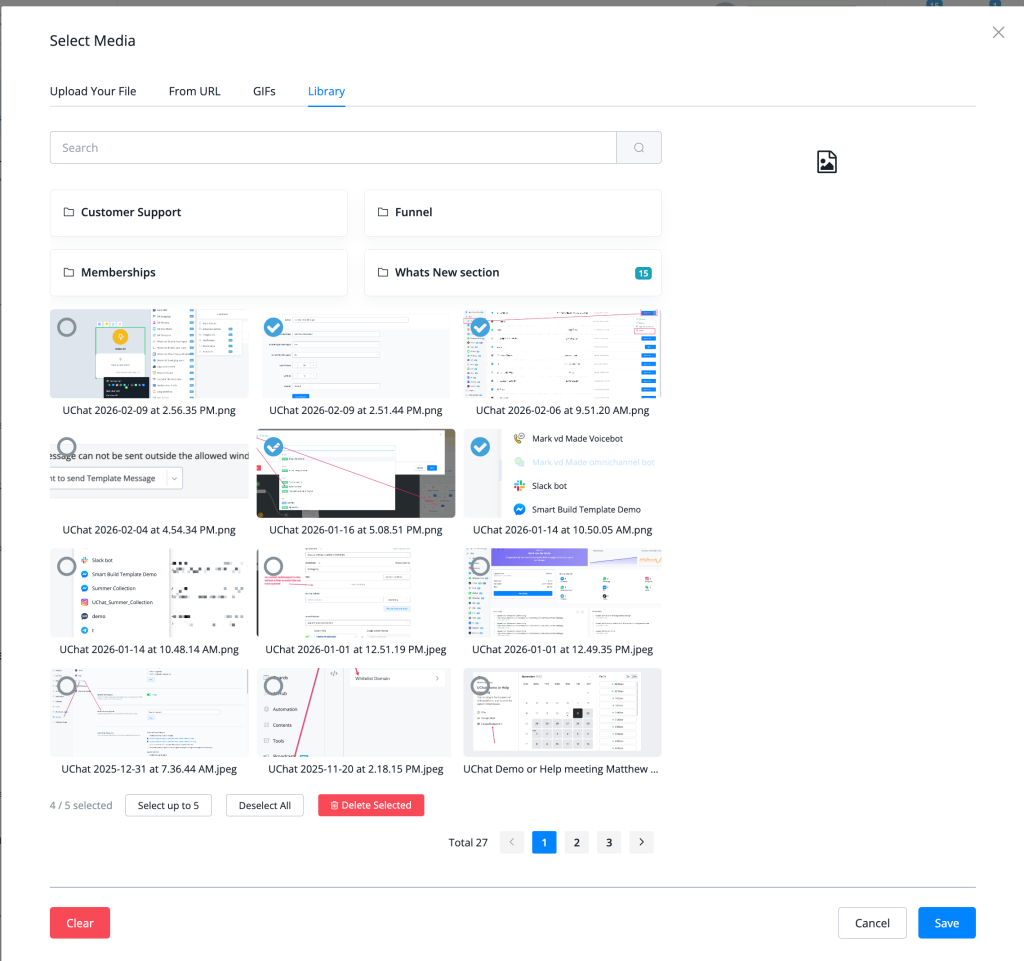
🖼 Multiple selection UI — the media library now shows checkmarks on selected items with a count indicator ("4 / 5 selected")
🔵 "Select up to 5" button — clearly indicates the maximum selection limit in the picker toolbar
🗂 Library, URL, GIF, and Upload tabs all support the updated multi-select behaviour
🗑 Bulk delete — selected items can be deleted in batch using the "Delete Selected" button
How to Use
In Live Chat, open the media/attachment picker
Switch to the Library tab (or use Upload Your File, From URL, or GIFs)
Click to select up to 5 images or files — a blue checkmark appears on each selected item
The toolbar shows the current selection count (e.g., "4 / 5 selected")
Click Save — all selected files are sent as attachments in a single message action
Feature: Verify 2FA code is required when enabling 2FA authentication
2FA Code Verification Now Required When Enabling Two-Factor Authentication
UChat now requires users to verify a valid 2FA code before two-factor authentication is fully activated on their account — preventing misconfigured or broken authenticator setups from locking users out.
What Changed
🔐 Verification step added to 2FA setup flow — users must successfully enter the code from their authenticator app before 2FA is marked as enabled
✅ Ensures the authenticator app is correctly configured and synced before the feature is active
🚫 Prevents the scenario where 2FA is "enabled" but the QR code was scanned incorrectly or the time sync is off — which would result in the user being locked out on next login
🔄 No change to the 2FA login flow — only the initial setup/enable step is affected
How It Works
Go to Profile → Security
Enable Two-Factor Authentication — a QR code is displayed
Scan the QR code with your authenticator app (Google Authenticator, Authy, etc.)
NEW: Enter the 6-digit code from your authenticator app to confirm it is working correctly
2FA is now activated — only after successful verification
Why It Matters
Eliminates the risk of users enabling 2FA with a broken/unsynced authenticator setup and then losing access to their account
Follows security best practices — all major platforms (Google, GitHub, Stripe) require verification before 2FA activation
Reduces support tickets related to 2FA lockouts caused by misconfigured authenticator apps
Feature: update the Calude AI default model to claude-haiku-4-5
## Update
### Claude AI Default Model Updated to claude-haiku-4-5
The default Anthropic Claude model used across UChat's AI features has been upgraded from the previous Haiku version to **claude-haiku-4-5** — Anthropic's fastest and most cost-efficient model, released October 2025.
#### What's New - ⚡ **Faster and smarter default** — claude-haiku-4-5 matches Claude Sonnet 4's performance on coding, computer use, and agent tasks at a fraction of the cost [web:41] - 🧠 **Extended thinking support** — the first Haiku model to support reasoning, enabling controllable reasoning depth for complex tasks [web:43] - 📐 **8× more output tokens** — max output expanded from 8,192 to 64,000 tokens per response [web:40] - 💰 **Cost-efficient for high-volume use** — $1/$5 per million input/output tokens, ~3× cheaper than Claude Sonnet 4.5 [web:42] - 🔄 No action required — existing AI Agents, AI Tasks, and AI Intent Recognition will automatically use the new default model unless a specific model has been manually configured
#### Why It Matters - All UChat workspaces on the default Anthropic/Claude provider immediately benefit from near-frontier AI performance at sub-agent speeds - The 64K output token limit enables significantly longer, more detailed AI-generated responses in flows and live chat - claude-haiku-4-5 is optimised for real-time, high-volume agentic applications — exactly the workload UChat AI Agents and AI Tasks generate [web:43]
> 👉 To manually select a different Claude model, go to: **AI Hub → AI Agents / AI Tasks → Edit → Provider Settings → Anthropic** > Published: **February 20, 2026**
Feature: add Partner Setting - allow to use Partner OpenAI api key for clients as default OpenAI api key
## New Partner Feature
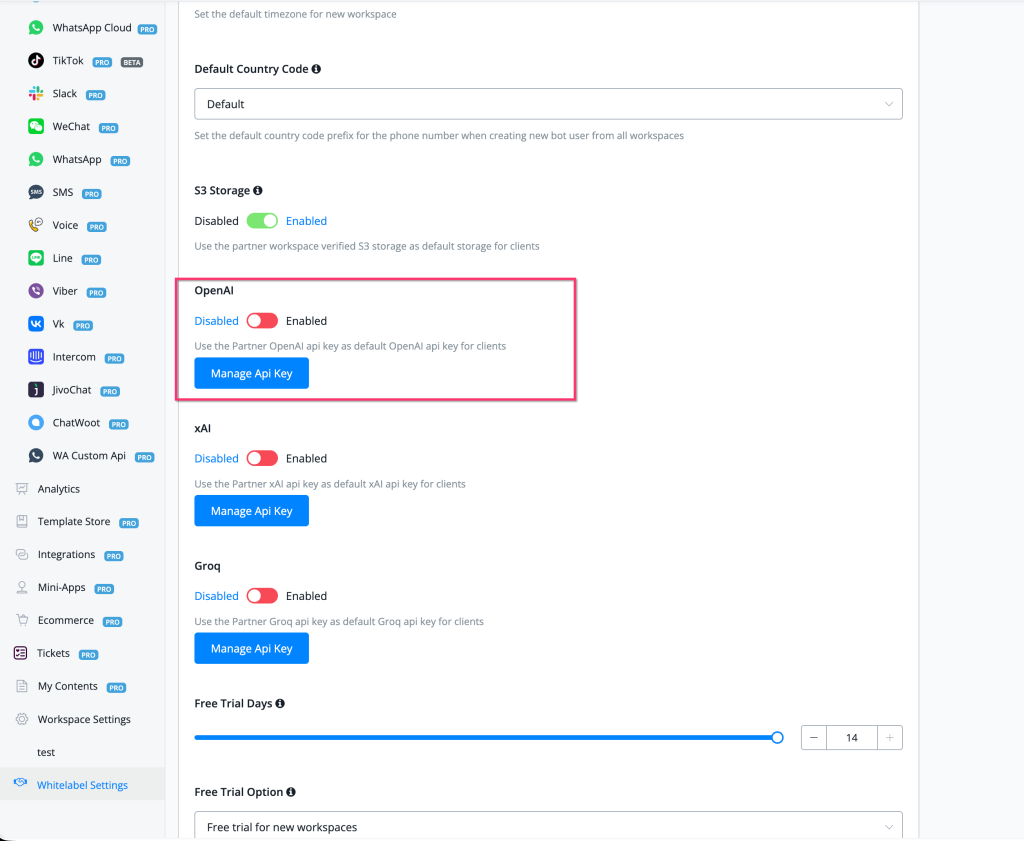
### Partner Setting — Use Partner OpenAI API Key as Default for Clients
Partners can now configure their own **OpenAI API key** in Whitelabel Settings and set it as the default OpenAI key used across all client workspaces — eliminating the need for each client to supply their own key.
#### What's New - 🔑 **New Partner Setting: OpenAI** — found under Whitelabel Settings alongside xAI and Groq partner key settings - 🔄 Toggle **Enabled/Disabled** to activate the partner key as the default for all client workspaces - 🛠 **Manage API Key** button — add, update, or rotate the Partner OpenAI API key at any time - 🤖 When enabled, all client workspaces use the partner's OpenAI key by default — clients don't need to configure their own - 📦 Part of a unified AI provider key management section in Whitelabel Settings covering **OpenAI**, **xAI**, and **Groq**
#### How to Use 1. Go to **Whitelabel Settings** in the left sidebar 2. Scroll to the **OpenAI** section (highlighted in the settings panel) 3. Toggle the switch to **Enabled** 4. Click **Manage API Key** to enter your OpenAI API key 5. All client workspaces will now use your partner OpenAI key as their default — no per-client key setup required
Full documentation: [Partner Setting — Global Open AI Integration](https://uchat.atlassian.net/wiki/spaces/UKB/pages/794427500/Partner+Setting#Global-Open-AI-Integration)
#### Related Partner AI Key Settings
| Provider | Setting | Description | |----------|---------|-------------| | **OpenAI** | Partner OpenAI *(new)* | Use partner OpenAI key as default for all clients | | **xAI** | Partner xAI | Use partner xAI key as default for all clients | | **Groq** | Partner Groq | Use partner Groq key as default for all clients |
#### Why It Matters - Partners can absorb AI API costs centrally and offer clients a seamless AI experience without setup friction - Ideal for whitelabel deployments where clients should not need to manage their own AI provider keys - Enables partners to control which AI providers are available to clients and standardise configurations across all workspaces
> 👉 Located at: **Whitelabel Settings → OpenAI → Manage API Key** > Published: **February 17, 2026**
Feature: change default xai model from grok-2 to grok-4-1-fast-non-reasoning
## Update
### Default xAI Model Updated to grok-4-1-fast-non-reasoning
The default xAI model used across UChat's AI features has been upgraded from **grok-2** to **grok-4-1-fast-non-reasoning** — delivering significantly faster responses and improved accuracy out of the box.
#### What's New - ⚡ **Faster default responses** — `grok-4-1-fast-non-reasoning` skips the reasoning token phase and returns instant, pattern-matched answers - 📐 **Massive context upgrade** — 2M token context window vs 131K previously, enabling much longer conversations and documents - 🤖 **Optimised for agentic workflows** — Grok 4.1 Fast is xAI's best tool-calling model, designed for real-world use cases like customer support and automated pipelines - 🔄 No action required — existing AI Agents, AI Tasks, and AI Intent Recognition will automatically use the new default model unless a specific model has been manually configured
#### Why It Matters - Users on the default xAI provider will immediately benefit from faster, higher-quality AI responses without any configuration changes - Grok 4.1 Fast Non-Reasoning is purpose-built for the kind of high-throughput, tool-calling workflows that UChat AI Agents and AI Tasks require - Pairs with the new **Default AI Provider** setting in AI Hub Settings (released March 2026) for full AI configuration control
> 👉 To manually select a different xAI model, go to: **AI Hub → AI Agents / AI Tasks → Edit → Provider Settings** > Published: **February 16, 2026**
Feature: add API to list AI Agents and update AI Agent Provider and AI Model
Flow API — List AI Agents & Update AI Agent Provider/Model
Two new Flow AI Hub API endpoints let you programmatically retrieve all AI Agents in a workspace and update the AI provider and model assigned to any specific AI Agent — part of the broader Flow AI Hub API group.
New Endpoints
MethodEndpointDescriptionGET | /flow/ai-agents | List all AI Agents in the workspace POST | /flow/update-ai-agent-provider | Update the AI provider and model for a specific AI Agent
Related AI Hub Endpoints (same group)
MethodEndpointDescriptionGET | /flow/ai-tasks | List all AI Tasks in the workspace POST | /flow/update-ai-task-provider | Update the AI provider and model for a specific AI Task
What's New
🤖 List AI Agents via API — retrieve all configured AI Agents in the workspace with a single GET call
⚙️ Update AI Agent provider & model via API — programmatically switch the AI provider (OpenAI, Groq, Anthropic, xAI, etc.) and specific model for any AI Agent
🔑 All endpoints are authenticated (lock icon visible) — require a valid API token
🔄 Consistent with the parallel AI Tasks endpoints (/flow/ai-tasks and /flow/update-ai-task-provider) for a unified AI Hub API pattern
How to Use
Authenticate with your API key
Call GET /flow/ai-agents to retrieve the list of AI Agents and their current provider/model assignments
Call POST /flow/update-ai-agent-provider with the Agent ID and the desired provider + model in the request body to update the configuration
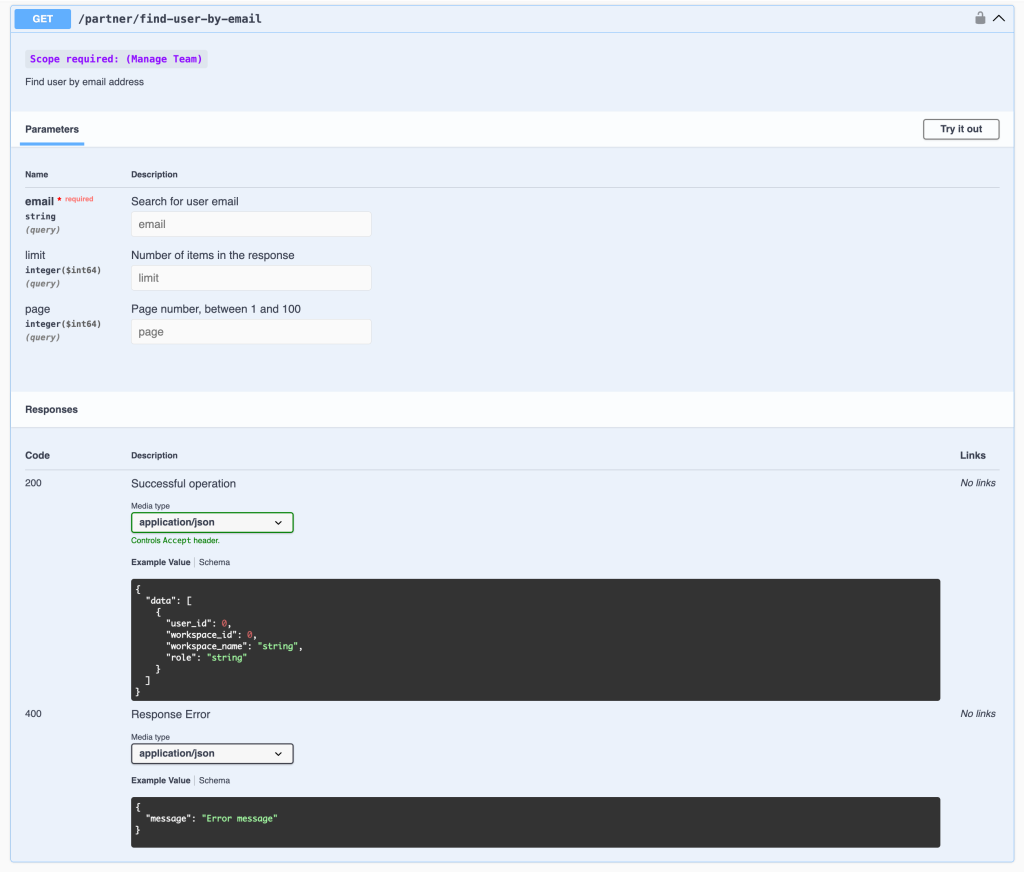
A new Partner API endpoint lets partners search for any user account by email address — returning the user's workspace memberships, workspace IDs, and roles across all workspaces they belong to.
New Endpoint
MethodEndpointDescriptionGET | /partner/find-user-by-email | Find user by email address
Parameters
NameTypeRequiredDescriptionemail | string (query) | ✅ Yes | Email address to search for limit | integer ($int64, query) | No | Number of items in the response page | integer ($int64, query) | No | Page number, between 1 and 100
Feature: allow to use Widget Code in the install script url for Chat Button type widget
Widget Code in Install Script URL — Chat Button Widget
The Chat Button widget now supports a custom Widget Code field — allowing you to use a short, memorable code instead of the auto-generated numeric widget ID in the install script URL.
What's New
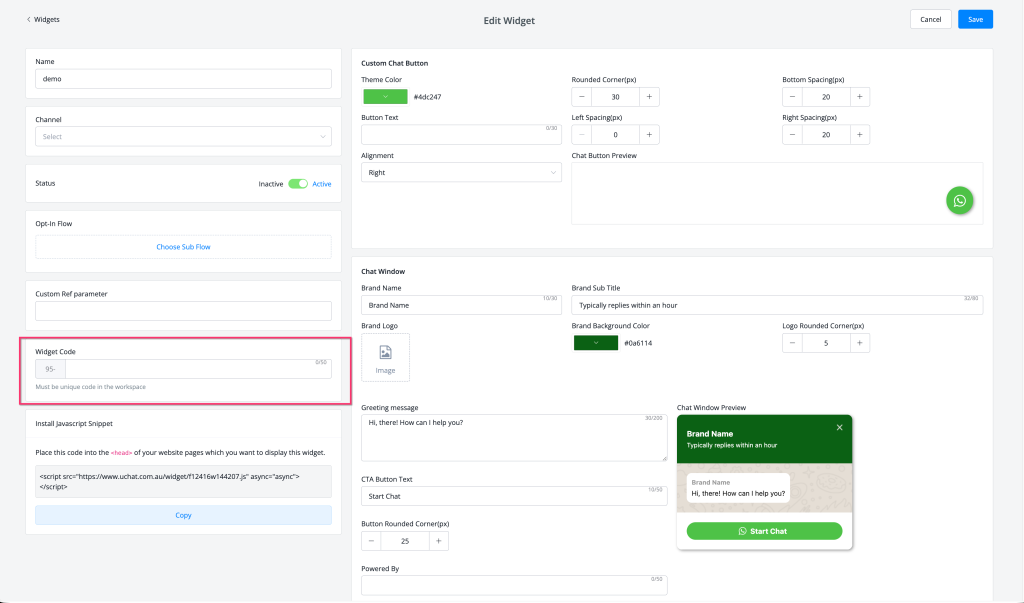
🔢 New field: Widget Code — a unique, editable code for your widget (e.g., 95-yourbrandname) added to the Edit Widget screen
🔗 The Widget Code is used directly in the Install JavaScript Snippet URL, replacing the default numeric ID
✅ Must be unique within the workspace — a validation hint is shown below the field
📋 Install snippet updates automatically when a Widget Code is set — copy it directly from the widget editor
Install Script Format
<!-- With Widget Code -->
<script src="https://www.uchat.com.au/widgetf/{WidgetCode}" async="async"></script>

<!-- Example -->
<script src="https://www.uchat.com.au/widgetf/12416w/144207.js" async="async"></script>
How to Use
Go to Mini-Apps → Widgets and open or create a Chat Button type widget
In the Widget Code field (highlighted in red, left panel), enter a unique code for your widget
The code must be unique within your workspace
Copy the updated Install JavaScript Snippet from the bottom of the left panel
Paste the snippet into the <head> of your website pages where you want the chat button to appear
Why It Matters
Gives partners and whitelabel users human-readable, branded widget URLs instead of opaque numeric IDs
Makes it easier to manage and identify widgets across multiple client websites
Simplifies widget deployment scripts when managing many sites — recognisable codes are less error-prone than long numeric IDs
👉 Located at: Mini-Apps → Widgets → Edit Widget → Widget Code Published: February 9, 2026
Feature: add new Question Item in Question node - Silent Input
Silent Input — New Question Item in the Question Node
The Question node now supports a Silent Input item type — allowing the bot to wait for a user response without displaying any visible message or prompt to the user.
What's New
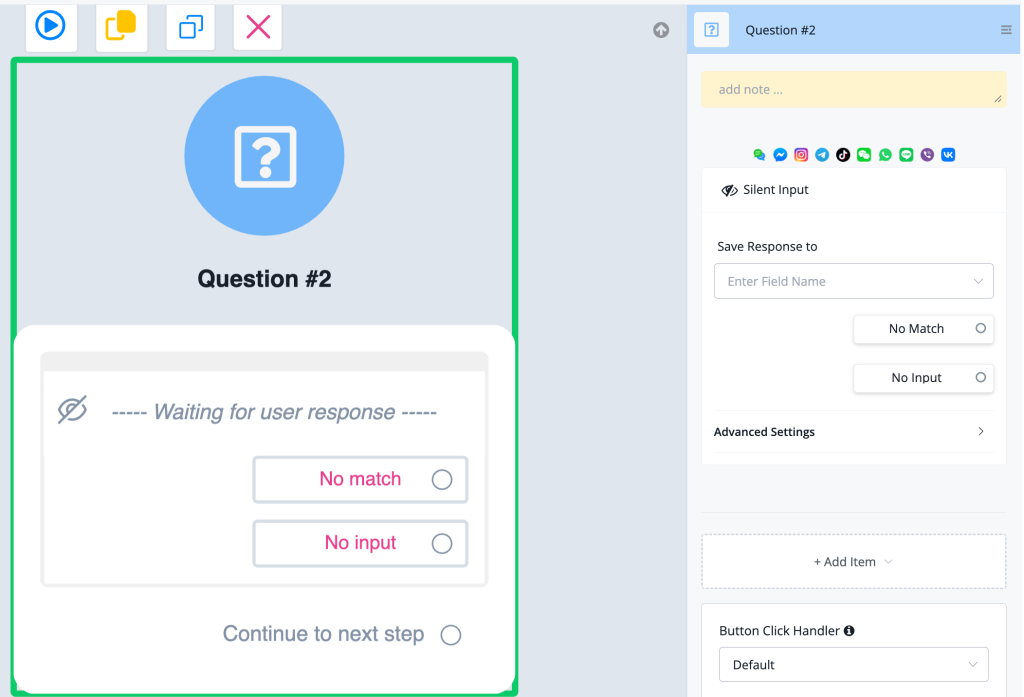
🔇 New question item: Silent Input — adds a waiting step that listens for user input without sending any outgoing message
👁 Displayed with a hidden/eye-off icon (🚫👁) in the flow canvas to distinguish it from regular question items
💾 Supports Save Response to field — capture the silent input into any custom user field
🔀 Includes No Match and No Input exit paths — handle invalid responses or timeouts just like standard question items
⚙️ Compatible with Advanced Settings and Button Click Handler for full flow control
📱 Works across all supported channels (WeChat, Messenger, Instagram, Telegram, TikTok, WhatsApp, Line, Viber, VK, etc.)
How to Use
Open or create a Flow in Flow Builder
Add a Question node to your canvas
Click + Add Item inside the Question node
Select Silent Input from the item type list
(Optional) Set a Save Response to field to capture whatever the user sends
Connect the No Match, No Input, and Continue to next step exit paths as needed
Use Cases
Capture a user's free-text reply after a previous message node without repeating a question
Wait silently for an inbound message at a specific point in the flow (e.g., awaiting a payment confirmation or image upload)
Build multi-step input flows where the prompt is delivered by a preceding Message node and the Question node only needs to capture the response
Why It Matters
Separates the "display a message" concern from the "capture user input" conce
Feature: add Integration - Google My Business - allow to list reviews, reply review by location
New Integration
Google My Business — List & Reply to Reviews by Location
UChat now integrates with Google My Business, allowing you to connect your Google account and manage business reviews directly from your workspace — including listing reviews and replying to them per business location, all within the Flow builder.
What's New
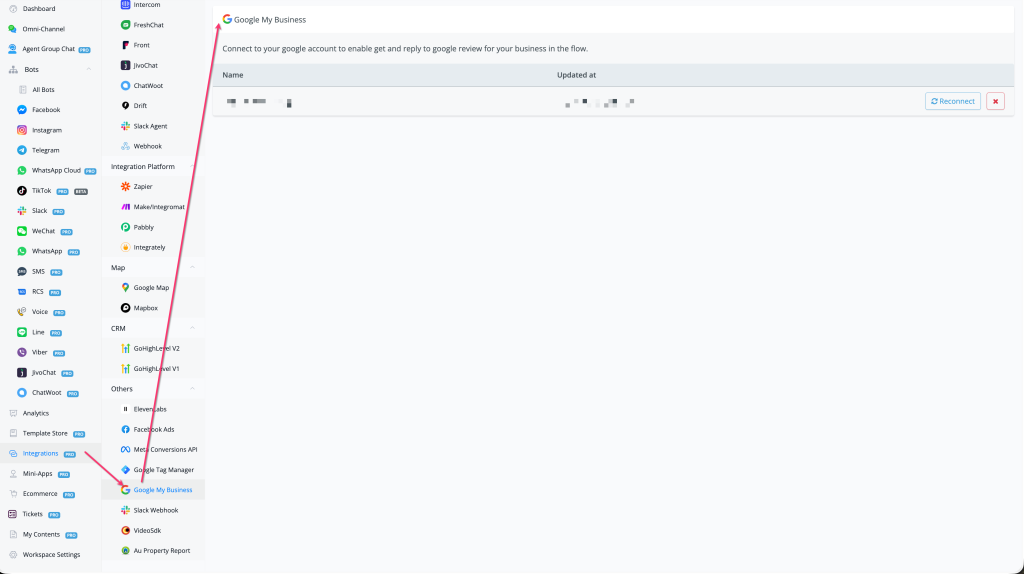
🏢 New integration: Google My Business — found under Integrations → Others → Google My Business
🔗 Connect your Google account via OAuth to link your GMB profile
📋 List reviews by location — retrieve Google reviews for any of your business locations
💬 Reply to reviews by location — send replies to customer reviews directly from a flow
🔄 Reconnect support — easily reauthorise your Google account if the connection expires
How to Use
Go to Integrations in the left sidebar
Scroll to the Others section and select Google My Business
Click Connect and authorise with your Google account
Your linked business location will appear in the integration panel
In your Flow builder, use the Google My Business actions to List Reviews or Reply to a Review for a selected location
Use Cases
Automatically monitor and respond to new Google reviews as part of a customer feedback flow
Trigger follow-up messages or internal alerts when a review is received
Build reputation management automations that reply to reviews based on star rating or keywords
Why It Matters
Brings Google review management into UChat's automation ecosystem — no need to switch between platforms
Especially valuable for local service businesses (e.g., ProfitsLocal clients) managing multiple Google Business locations
Pairs naturally with Google Map integration already available in UChat
👉 Located at: Integrations → Others → Google My Business Published: November 19, 2025
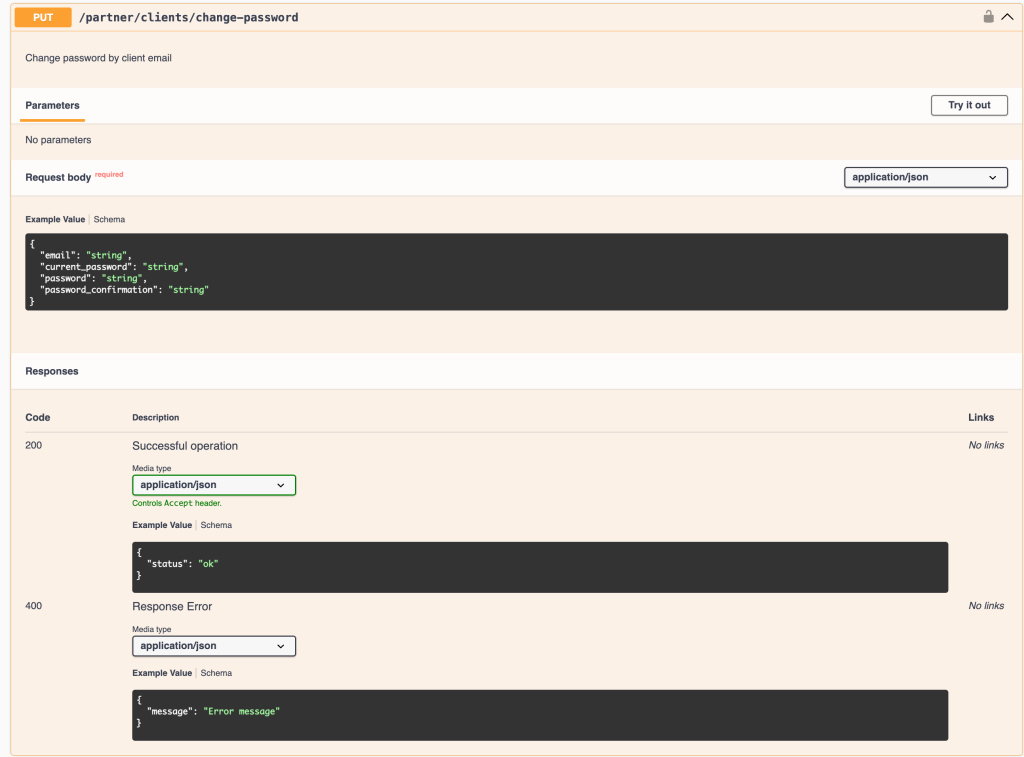
| Field | Type | Description | |-------|------|-------------| | `email` | string | The client's account email address | | `current_password` | string | The client's existing password | | `password` | string | The new password to set | | `password_confirmation` | string | Must match `password` |
#### What's New - 🔐 **Change client passwords via Partner API** — update account credentials for any client by their email address - 📦 No path parameters — all fields passed in the JSON request body - ✅ Simple `{ "status": "ok" }` confirmation on success - ⚠️ Requires knowledge of the client's `current_password` as a security check
#### How to Use 1. Authenticate with your **Partner API
Feature: add Partner Addon - allow to enable Google Recapthchat on Register page
## New Partner Feature
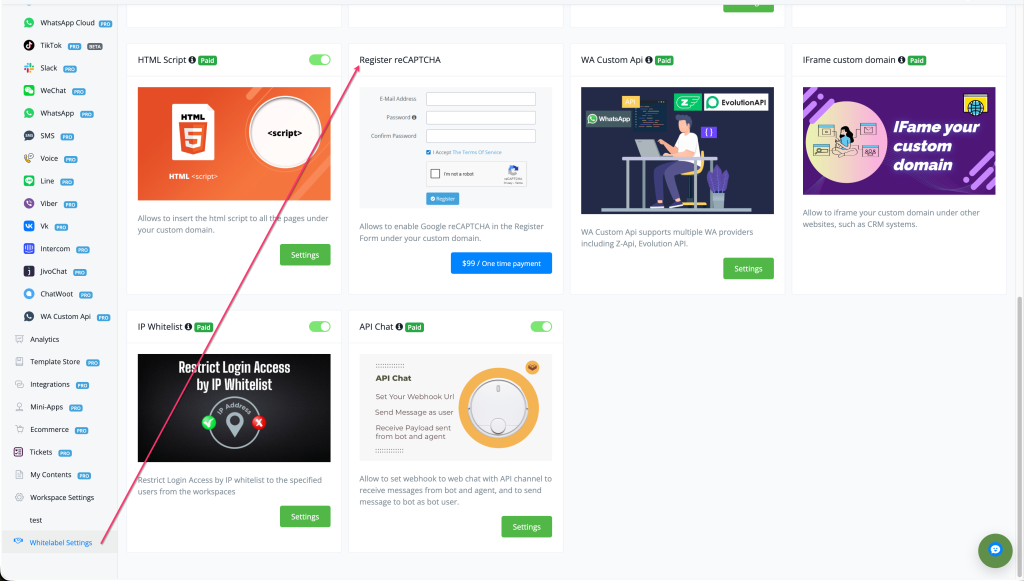
### Google reCAPTCHA on Custom Domain Register Page
Partners can now enable **Google reCAPTCHA** on the Register Form under their custom domain — adding bot protection to the signup flow.
#### What's New - 🔒 **New Partner Addon: Register reCAPTCHA** — enable spam and bot protection on your whitelabel registration page - ✅ Adds the standard "I'm not a robot" reCAPTCHA checkbox to the Register Form - 🌐 Applies to your custom domain's registration page only — no impact on the default UChat domain - 🛠 Configurable from Whitelabel Settings → Add-ons → Register reCAPTCHA
#### How to Use 1. Go to **Whitelabel Settings** in the left sidebar 2. Navigate to **Add-ons** 3. Find **Register reCAPTCHA** and toggle it **on** 4. reCAPTCHA will now appear on the Register Form at your custom domain URL
#### Why It Matters - Prevents automated bot signups on your whitelabel platform - Protects workspace integrity and reduces spam accounts - Gives partners enterprise-grade security controls over their registration flow
> 👉 Partner-only feature. Available under **Whitelabel Settings → Add-ons → Register reCAPTCHA**.
Feature: add API to update workspace settings for live chat sidebar features
## New Feature
### Workspace API — Configure Live Chat Sidebar via API
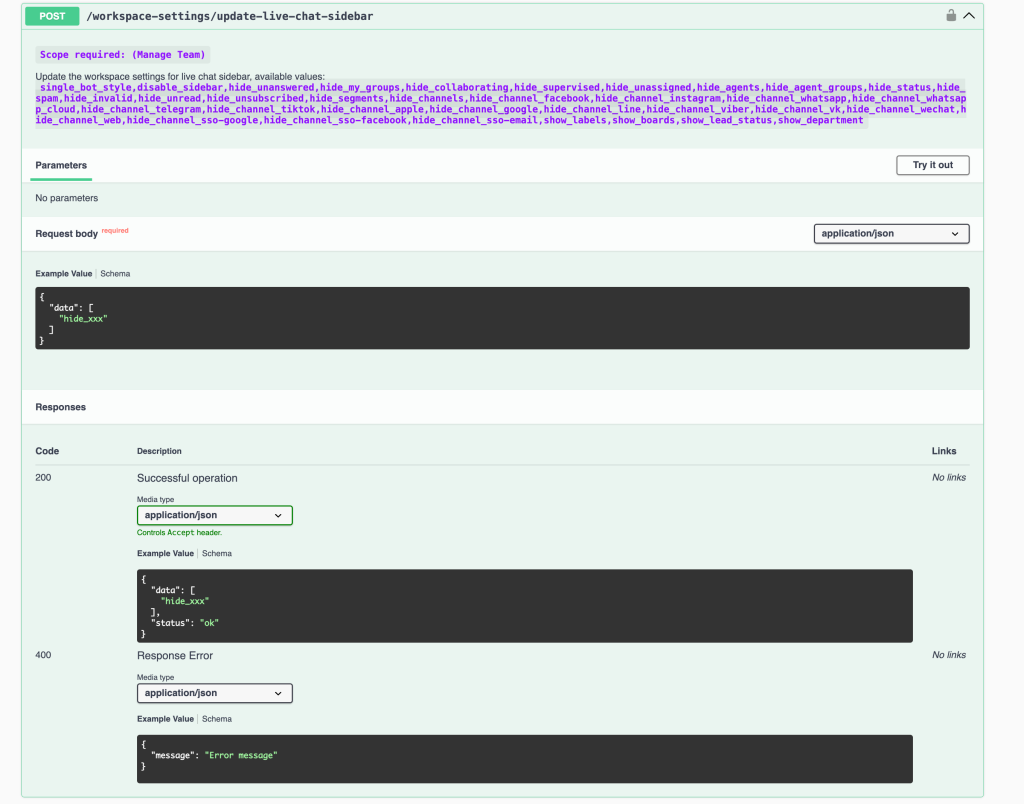
A new Workspace API endpoint lets you programmatically control which features, filters, and channels are visible in the Live Chat sidebar — replicating the full set of options available in the Workspace Settings UI.
#### New Endpoint
| Method | Endpoint | Description | |--------|----------|-------------| | `POST` | `/workspace-settings/update-live-chat-sidebar` | Update workspace settings for the live chat sidebar |
#### Request Body
Send a JSON object with a `data` array containing the feature flags you want to activate:
```json { "data": [ "hide_xxx" ] } ```
#### Available Values
Pass any combination of the following flags in the `data` array:
#### What's New - 🖥️ **Full programmatic control over the Live Chat sidebar layout** — show or hide any conversation filter, channel tab, or UI panel - 📦 No path parameters required — all configuration passed in the request body as a `data` array - 🔑 Requires **Manage Team** scope on your API token - ✅ 200 response confirms the active flags; 400 returns `{ "message": "Error message" }`
#### How to Use 1. Authenticate with your API key (**Manage Team** scope required) 2. Call `POST /workspace-settings/update-live-chat-sidebar` 3. Pass a JSON body with the `data` array listing all flags you want **active** 4. Flags not included in the array are treated as disabled/visible by default
Full API docs: [api#/Workspace/workspaceSettingsLiveChatSidebarUpdate](https://www.uchat.com.au/api#/Workspace/workspaceSettingsLiveChatSidebarUpdate)
#### Why It Matters - Partners can standardise Live Chat sidebar layouts across all client workspaces during provisioning - Combine with `POST /workspace-settings/update-channels` (released same day) for complete workspace configuration automation - Enables custom whitelabel experiences where only relevant channels and filters are shown per workspace
Feature: add API to update workspace settings for show-hide channels
Workspace API — Show/Hide Channels via API
A new Workspace API endpoint allows you to programmatically show or hide any channel in the workspace sidebar — the same controls previously only available through the Workspace Settings UI.
New Endpoint
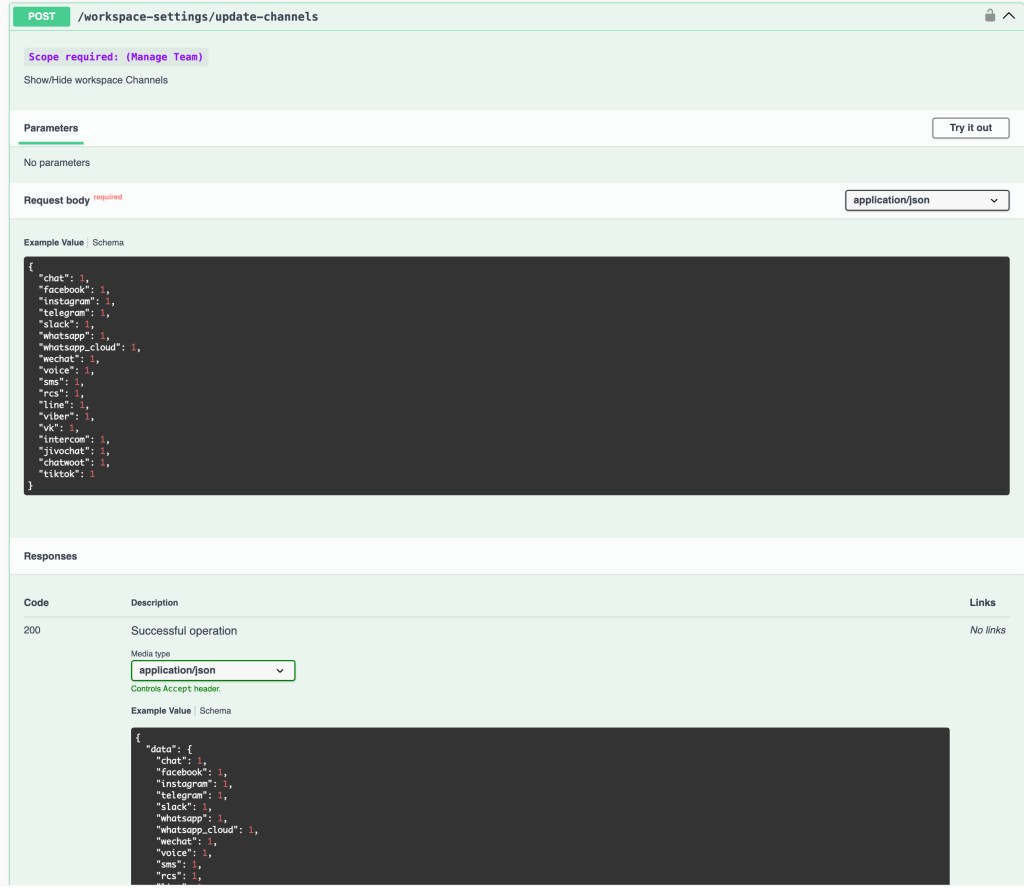
MethodEndpointDescription | POST | /workspace-settings/update-channels | Show/Hide workspace channels
Request Body
Send a JSON object with each channel name as a key and 1 (show) or 0 (hide) as the value:
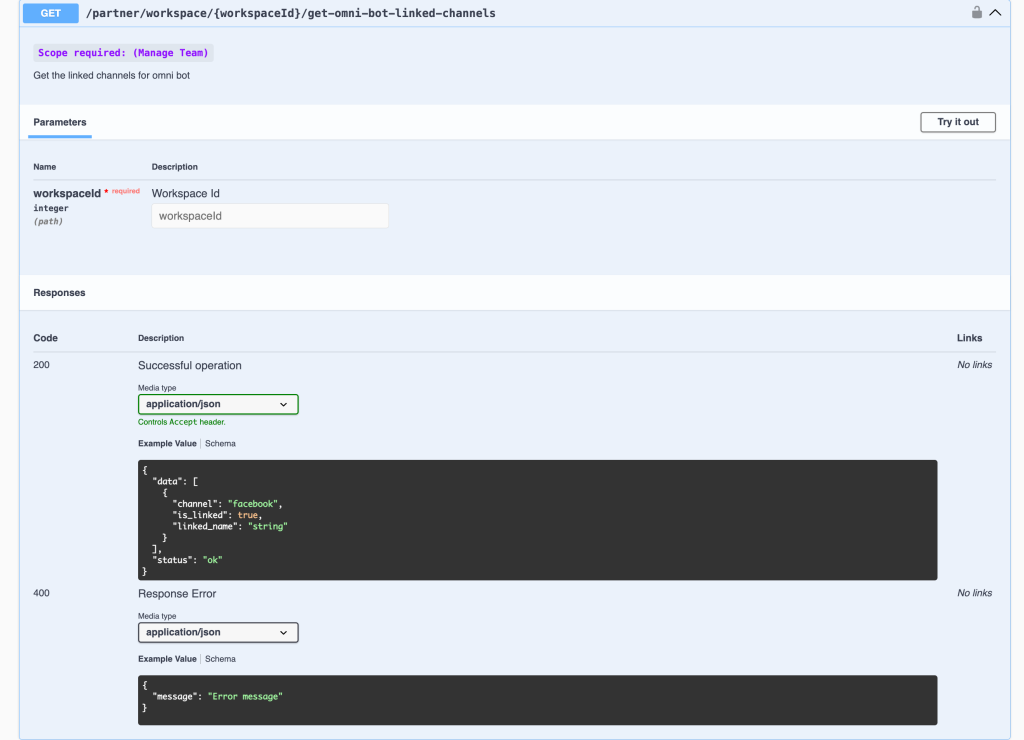
Feature: Partner Api - Get Omni bot linked channels
Partner API — Get Omni Bot Linked Channels
A new Partner API endpoint lets partners programmatically retrieve all channels linked to the Omni Bot in any client workspace.
New Endpoint
MethodEndpointDescription | GET | /partner/workspace/{workspaceId}/get-omni-bot-linked-channels | Get the linked channels for the Omni Bot in a workspace
Parameters
NameTypeRequiredDescription | workspaceId | integer (path) | ✅ Yes | The ID of the target workspace
🤖 Retrieve Omni Bot channel links via API — check which channels (Facebook, WhatsApp, Instagram, Telegram, etc.) are connected to the Omni Bot in any workspace
🔍 Returns channel, is_linked status, and linked_name for each channel
🔑 Requires Manage Team scope on your Partner API token
How to Use
Authenticate with your Partner API key (Manage Team scope required)
Call GET /partner/workspace/{workspaceId}/get-omni-bot-linked-channels with the target workspace ID
Parse the data array to see which channels are currently linked and their display names
Feature: add Week Start Day in workspace settings for Analytics report options This Week and Last Week
## New Feature
### Week Start Day Setting in Workspace Settings
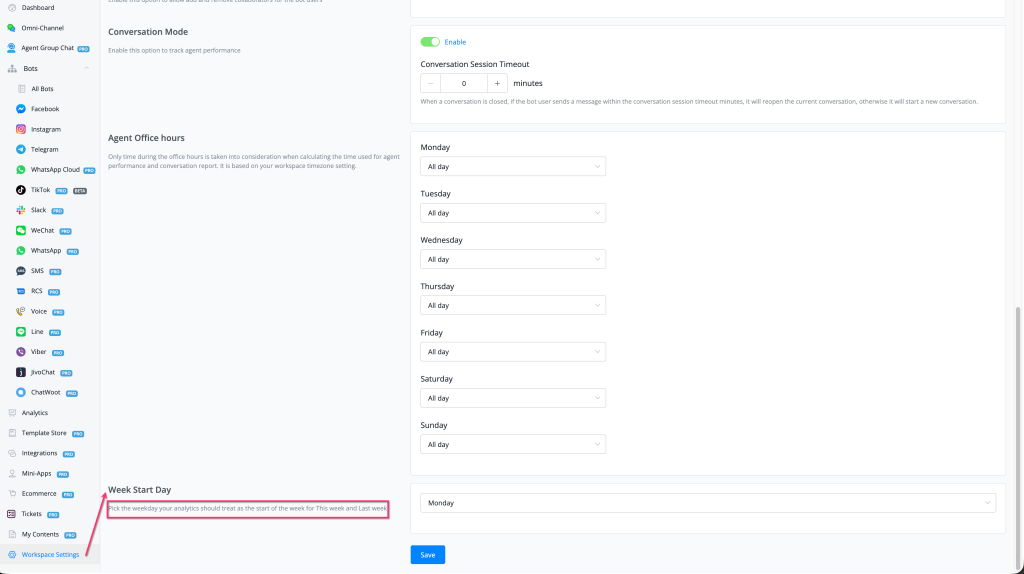
You can now configure which day of the week your analytics treat as the **start of the week** — directly affecting the **"This Week"** and **"Last Week"** date range filters across all Analytics reports.
#### What's New - 📅 **New setting: Week Start Day** — found under Workspace Settings → Agent Office Hours section - 🗓 Choose any day (Monday–Sunday) as your week's anchor day - 📊 Immediately affects the **"This Week"** and **"Last Week"** date range options throughout Analytics reports - 🌏 Works in conjunction with your workspace timezone setting
#### How to Use 1. Go to **Workspace Settings** in the left sidebar 2. Scroll down to the **Week Start Day** section 3. Select your preferred start day from the dropdown (default: **Monday**) 4. Click **Save** 5. Analytics reports using **"This Week"** or **"Last Week"** filters will now calculate ranges from your chosen start day
#### Why It Matters - Teams operating on a Sunday–Saturday work week (common in the US and Middle East) can now align analytics to their actual business week - Ensures "This Week" and "Last Week" comparisons are consistent with internal reporting standards - Removes ambiguity when reviewing agent performance and conversation reports across different regional teams
Feature: Partner API - add WhatsApp phone number from 360dialog provider
## New Partner Feature
### Partner API — Add WhatsApp Number via 360dialog Provider
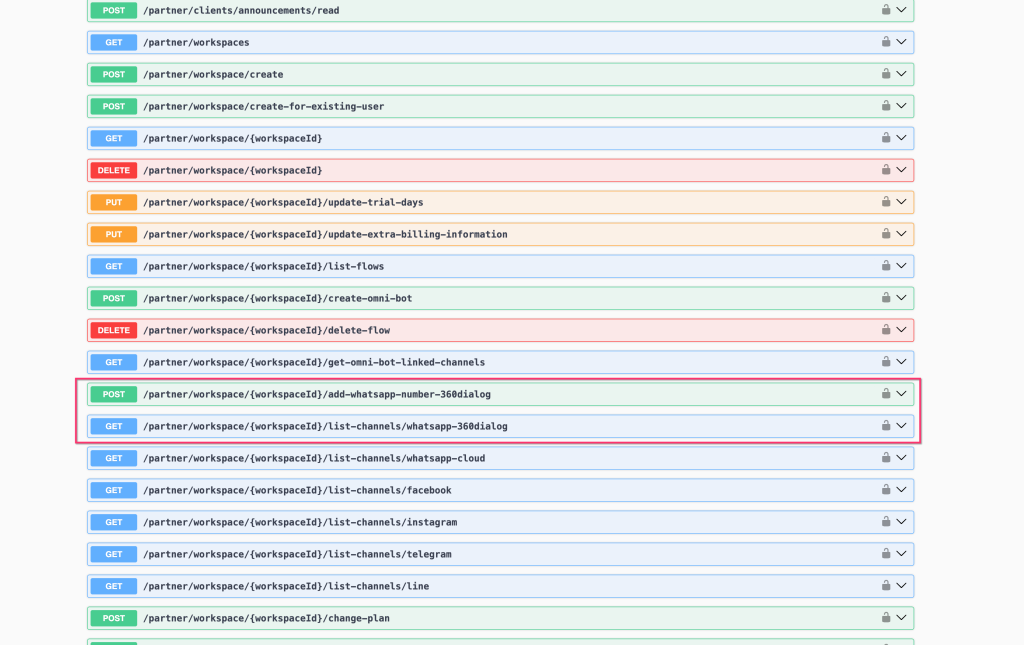
Two new Partner API endpoints allow partners to programmatically connect 360dialog WhatsApp numbers to any workspace on their platform.
#### New Endpoints
| Method | Endpoint | Description | |--------|----------|-------------| | `POST` | `/partner/workspace/{workspaceId}/add-whatsapp-number-360dialog` | Add a 360dialog WhatsApp phone number to a workspace | | `GET` | `/partner/workspace/{workspaceId}/list-channels/whatsapp-360dialog` | List all 360dialog WhatsApp channels in a workspace |
#### What's New - 📱 **Add 360dialog numbers via API** — provision WhatsApp channels in client workspaces programmatically without manual setup in the UI - 📋 **List 360dialog channels via API** — retrieve all connected 360dialog numbers in a given workspace - 🔄 Consistent with existing channel-listing endpoints for WhatsApp Cloud, Facebook, Instagram, Telegram, and Line
#### How to Use 1. Authenticate with your **Partner API key** 2. Call `POST /partner/workspace/{workspaceId}/add-whatsapp-number-360dialog` with the required 360dialog credentials in the request body 3. Use `GET /partner/workspace/{workspaceId}/list-channels/whatsapp-360dialog` to verify the channel was added successfully
Full API documentation: [partner-api#/Partner Management](https://www.uchat.com.au/partner-api)
#### Why It Matters - Enables fully automated WhatsApp onboarding for partners managing many client workspaces - Supports 360dialog as a WhatsApp Business Solution Provider (BSP) alongside the existing WhatsApp Cloud provider - Reduces manual steps when provisioning new client accounts at scale
> 👉 Partner-only feature. Requires a valid Partner API token.
Feature: add Is Bot Paused in list bot users filter
### Added "Is Bot Paused" condition to Bot Users filter
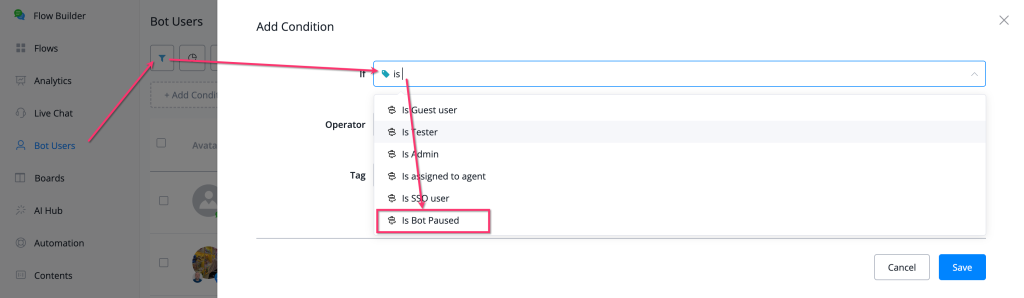
You can now filter your **Bot Users** list by pause state — quickly surfacing all contacts whose bot has been paused.
#### What's New - 🔍 **New filter condition: Is Bot Paused** — available under Bot Users → Filter → Add Condition → "Is Bot Paused" - 🔄 Works with both `is` and `is not` operators to include or exclude paused contacts - 📋 Consistent with the existing "Is" condition family: Is Guest User, Is Tester, Is Admin, Is Assigned to Agent, Is SSO User

 Powered by FeedBear